
Online Office Hours Through Microsoft Bookings
Using Microsoft Bookings for office hours offers a way to hold office hours for students who are not in a registered in a course or in a Canvas site. Appointments will appear in your Office 365 calendar. This option is especially useful if you need to:
- book office hours for a group of teaching assistants for a class.
- book office hours for staff of a campus center, project, or group.
Note: The Bookings tool is available to all members of the University of Chicago community. The tool is most effective for users of Microsoft Outlook. Users of other calendaring tools will not be able to take advantage of syncing features that allow Bookings to prevent appointment conflicts with an individual calendar.
Getting Started
Set Up Your First Bookings Calendar
- Go to portal.office.com.
- Click the Bookings icon to set up a new Office 365 calendar to hold your bookings.
- Click Get it now on the Bookings page.
- In the Choose a calendar box, click Add a booking calendar.
- Complete the fields as appropriate in the Tell us about your business box and click Continue.
Notes:
Do not click No thanks to skip this box, or you will not be able to add your calendar. You can change your business information settings from the Home screen after your calendar is created.- Business Name: choose a business name that describes the organizational unit this calendar serves. It is very important to pick something other than the exact way your name normally appears as the name of the Business. Otherwise, any duplicate use of names will mean that the entry for your calendar and the entry for your individual or department contacts will look the same in the Outlook address book, and people using the address book to try to contact you won’t know which one is correct. You could choose something like Office Hours SOSC 23000 Intro to Civ S Asia for an appointment calendar for instructors and TAs for a course, or Academic Advising Appts for Philosophy Majors to take appointments for students needing academic advising in your department. Choose this name carefully as it can only be changed by submitting a ticket to IT Services. Any change to the name you make yourself will only affect the display name, not the name in the global address book or the name in the URL for your calendar.
- Business address: for virtual meetings, you can use the URL for your meeting space, or just enter “Zoom or Teams location provided with appointment conformation”.
- Bookings will set up your calendar and take you to the Bookings homepage. You will receive a confirmation email for your new booking calendar that provides some basic information about managing it.

- To return to your Bookings homepage, always return to portal.office.com. You will need to be logged in using your CNetID and password.
A Note About Terminology
Academic users should keep in mind that Bookings was primarily developed for use by businesses such as salons or sales offices, so the language used on the interface does not exactly match University usage. Here is how you should translate terms:
- Bookings: unless it refers to the Bookings application itself, “bookings” means “appointments”.
- Staff: any people who are taking appointments through Bookings. These can be faculty, teaching assistants, or University staff; consultants, or anyone you want to provide appointments.
- Business: this will usually be the organizational unit through which people will provide appointments. Examples of a “business” might be a section of a class, a lab, a research group, or an academic department. Within that business, you assign one or more staff who can all accept appointments using the same calendar.
- Customers: these will probably be students, but could be anyone else inside or even outside the University you expect to request appointments using the calendar.
- Booking page: this is the appointment calendar that people use to request appointments.
Understand How Bookings Works
Bookings is designed to support a complex organization, called the Business, where one or more people offer one or more different services. In an academic context, this can have a number of possible applications:
- Manage a single calendar for a faculty member teaching multiple courses, and who has multiple teaching assistants offering office hours.
- Delegate appointment management for a group of faculty members to an administrative assistant in an academic department.
- Manage appointments for a laboratory where several staff are available for office hours, tutorials, or demonstrations.
- Offer windows of time during the week for support staff to conduct demonstrations or tutorials for University services. For example, IT Services might offer a tutorial for new software at a few different times during the week and set up those times in Bookings to allow people to sign up for any of those options.
The Business offers Services. Your business might offer only one service, such as office hours, or you might define other services like exam reviews, lab demonstrations, office hours for specific courses if you have multiple sections, or makeup exams. You can define different time durations for each service, and assign specific staff to them, so think about the kinds of things students usually need to do in their appointments, how long these things take, and who the best people are for those assignments, if you have multiple people to take on the work. Of course, if it’s only you, and your office hours are simple events, Bookings will accommodate that too.
Services are assigned to Staff. Staff can be anyone who will take appointments using this calendar. Faculty, students, and University staff are all “staff” in Bookings.
Customers use the Booking Page to schedule appointments for one or more Services you defined. If you are an Office 365 user, Bookings will sync with your Outlook calendar to make sure you don’t end up with double bookings and will also let you define a scheduling policy to help you keep your day manageable.
For an optimal Bookings experience, we recommend you establish the largest possible umbrella for all the services and staff represented in your calendar, then break that out into services and availability windows for staff to cover. Here is an example:
- You teach three courses for the spring 2020 semester, and you have two TAs each in two of those courses.
- You want to manage everything in one calendar, so you name your calendar Chemistry Course Appointments for Prof Smith. In the Staff screen, you add all the people you work with in your courses and labs as staff.
- Because you have three courses, you define an office hours service for each, and name them according to the section numbers. Perhaps you ask your students to make appointments if they need some extra time in the lab, so you’ll need a service for that as well. You can define specific windows during which services are offered, so if you only want TAs to take appointments in the mornings, or only want students coming for extra lab time in the late afternoon, you can set that limit.
- Now you’ll assign your staff to each service as appropriate. Each of your office hours services gets assigned to you and the TAs for that course. The Lab Time services gets assigned to your TAs or your lab staff.
- When you’re finished setting everything up, you can publish your Bookings calendar. You’ll have a URL to share on your syllabus, in Canvas, through email or IM, or however you need to communicate.
Instructions
The following sections provide the step-by-step details for setting up your entire Bookings calendar structure.
Navigate in Bookings
The Home page provides tips about using Bookings and exploring new features, a dashboard view of your current appointments, and a navigation pane for moving among Bookings’ main components.
Set Up Your Daily Business Hours and Update Your Business Information (Optional)
Set up your daily business hours if you want to indicate when your office or lab is open. Bookings stores 8 a.m. to 5 p.m. business hours for you by default. This is not intended to indicate the windows in which you, your colleagues, or your staff are accepting office hours appointments; only the times at which people are generally expected to be working.
- To get started, click Business Information in the left navigation pane. This information will be visible on your Bookings page to anyone seeking an appointment.
- Business Name: Once again, this name can only be changed by submitting a ticket to IT Services. Any change to the name you make yourself will only affect the display name, not the name in the global address book or the name in the URL for your calendar. It is very important to avoid using your own name exactly as it normally appears in the University’s global address book.
- Business address: for virtual meetings, you can use the URL for your meeting space, leave blank, or just enter “Zoom or Teams location provided with appointment confirmation”.
- Business phone: if there is a public phone number such as a department or lab extension where people can call to reach you and your staff, enter it here. We strongly recommend that you do not use personal phone numbers on your calendar.
- Send customer replies to: enter the email address where you want to receive notifications about activity on the calendar. This can be a group email address or the email for the individual who is the calendar administrator.
- Privacy policy URL and Terms and Conditions: the same privacy and Terms & Conditions applicable to any University-supported system apply to Bookings as well, so you may leave these fields blank.
- Business type: select Colleges and universities.
- Currency: since this is an academic context, there’s no need to enter a currency.
- Business logo: the University’s instance of Bookings adds UChicago branding to all Bookings views already, so you don’t need to add anything here unless you’d really like to.
- The approach you take to the Business Hours fields depends on how you are using Bookings. If you are only scheduling office hours for yourself, you can define your business hours as the hours you want to accept appointments. However, if you have multiple people taking appointments through the calendar, or if you are accepting appointments for different services at different times or different days of the week, you will need to define your business hours in terms of the working hours comprising all availability for all of your services and staff. By default, Bookings sets business hours as M-F, 8:00 a.m. – 5:00 p.m.

- Click Save at the upper left when you are finished.
Add Staff and Faculty
Bookings will work best if all of the people you want to assign to your calendar use an Office 365 calendar to manage their work day.
If you are managing office hours appointments for multiple instructors, teachings assistants, or staff, you’ll need to add them to your Bookings calendar. If they use an Office 365 Calendar (usually the calendar in Outlook) to manage their schedules, Bookings can sync with staff calendars so that visitors to your Bookings page can only make appointments only during their available times.
- Click Staff in the left navigation pane. Remember, this refers to any of the people who will use your calendar.
- Click Add staff in the upper left of the staff page.

- Add information about your staff member on the Staff details page.

- Add your staff member’s Initials and choose a color for their personal icon on the right. This will make their bookings easy to identify at a glance in the Bookings calendar.
- Type your staff member’s name in Add people. If they have a UChicago email address, they will appear as an auto-suggestion as you type. However, you can add staff with non-UChicago email addresses.
- Note: staff who are added with a non-UChicago email address will not be able to open the Bookings mailbox or make any edits to their Bookings calendar.
- If you want someone to be reachable by phone, add the phone number where they can be reached. Remember that this phone number will be visible on your Bookings page, so we recommend extreme caution regarding use of any personal telephone numbers or other contact information. You can leave this field blank.
- Assign your staff a user role. You can choose from three options:
- Administrator: can edit all settings, add and remove staff, and create, edit, and delete bookings. This role should be assigned to whoever you want to manage the calendar for everyone. This person will be able to change appointments, update availability and time off, update services, etc.
- Viewer: can see all the bookings on the calendar. They can’t modify or delete them. They have read-only access to the settings.
- Guest: can be assigned to bookings but they can’t open the Booking mailbox. There is no option to allow anyone to edit just their own appointments; administrators can manage all activity in the calendar, while the other two roles have no editing permissions at all. We recommend that you delegate the administrator role to one person, a TA or research assistant, for example, and avoid assigning multiple administrators to a calendar. This will prevent a lot of confusing activity and chaotic changes in complex schedules.
- Choose whether to notify staff by email about new bookings or changes to bookings. We strongly recommend that you enable this feature.
- Select whether to allow Office 365 activity to affect the staff member’s availability. This is useful only if they use an Office 365 (Outlook) calendar to manage their workday. If you enable this feature, the Bookings calendar will sync with their Office 365 calendar and prevent scheduling of conflicting bookings.
- Select whether to use the business hours you set up in the Business information screen as the hours your staff member is available for booking appointments. If you disable this setting, you will be able to define different hours for when people can schedule appointments with this staff member for any service. Remember that your business hours need to be wide enough to include all the hours any staff is available for appointments.
- Click Save at the upper left when you are finished.

Edit or Delete Staff or Faculty Details (Administrators Only)
If you need to update details for yourself or another staff member, go to the Staff screen. Hover over the entry for the person you want to edit, and two icons will become visible at the right end of the entry.
- To edit the staff member, click the pencil icon.
- To delete the staff member, click the trashcan icon.
Define Your Services
You must always have at least one service defined in your calendar. Edit the default service Bookings has inserted for you to suit your purposes, then add more as necessary.
Remember to think carefully about your services. Your business might offer only one service, such as office hours, or you might define other services like exam reviews, lab demonstrations, office hours for specific courses if you have multiple sections, or makeup exams. You can define different time durations for each service, and assign specific staff to them, so think about the kinds of things students usually need to do in their appointments, how long these things take, and who the best people are for those assignments, if you have multiple people to take on the work.
- Click Services in the left navigation pane.
- Hover over an existing entry for a service, and two icons will become visible at the right end of the entry.
- To edit the service, click the pencil icon.
- To delete the service, click the trashcan icon.

Edit a Service
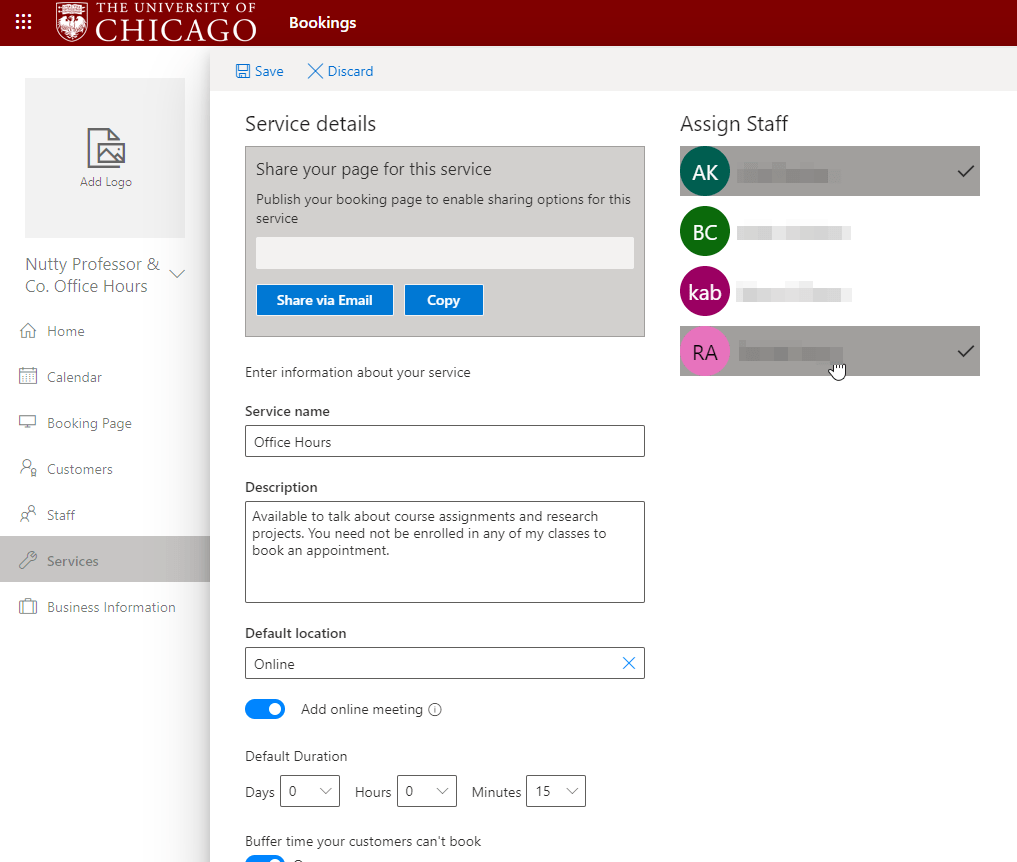
- Complete the service details form as follows:
Enter a Service Name, such as Office hours or Academic advising. - Add a brief description of the service. Make sure it’s clear how each service you offer differs from others, so that visitors to your calendar know what to book.
- Choose a default location. This is where people will be directed to go for their appointment when you are meeting them in person. For online appointments, enter Online.
- Enable/disable Add online meeting. This will create a join link for a virtual meeting in Microsoft Teams in the booking confirmation. Teams is the easiest way to use Bookings for virtual meetings, so we recommend that you do so. If you prefer Zoom, leave this disabled and add your Zoom location to the Location field. We recommended that you create a Zoom location for each service and limit access during active appointments for privacy.
- Choose a default duration for appointment.
- If you enable the Buffer time your customers can’t book setting, you will be able to choose a duration either before or after your meeting (or both) during which the staff member’s time can’t be booked.
Note: Buffer time gives you and your staff time to regroup between appointments and allows some time for appointments that run long, so we recommend enabling buffer time as a sanity saver. - Enable/disable Let the customer manage their booking. This allows the student or colleague booking the appointment to manage it themselves.
Note: if you disable this option, be sure to include a note in the confirmation email letting people know that if they want to make changes, they will need to contact you or a staff member to do so. Be aware that if you do allow students to manage their own appointments, all calendar users will need to be vigilant about monitoring for last-minute changes. - Set the Maximum number of attendees per event. For services like academic advisement that require privacy you can limit this to one attendee. For exam review sessions or labs, you can raise this limit to whatever maximum number you think can be reasonably managed at one time.
- Leave Default price set to Price not set.
- In Notes, include any information internal users might find useful about the scheduling policy, the purpose of the service, privacy considerations, etc.
- You can choose whether to display the following Custom fields on the booking page:
- Customer email
- Phone number
- Customer address
- Customer notes
If you display these fields, anyone making an appointment for the service will be required to provide the indicated information. We recommend you select at least the Customer email field, so that staff has a convenient way to reach people about their appointments.
- Add text for automatic reminders about the appointment at the intervals you prefer. We recommend including at least one reminder one day before the appointment. Be sure to include a reference to the specific service the student booked.Add additional information for the email confirmation. Using Teams for virtual appointments is most convenient, and a link to the Teams location will be included in the email confirmation, but if you are using a shared Zoom meeting space for your appointments for this service, you can add the information for accessing that space here, or just say “our staff will contact you with Zoom location information prior to your appointment.”
Note: Remember to not include information for individual Zoom accounts if more than one person can be booked for a service! - The person scheduling the appointment will receive an email that includes your message, and a link to the Teams meeting location if you are using Teams.

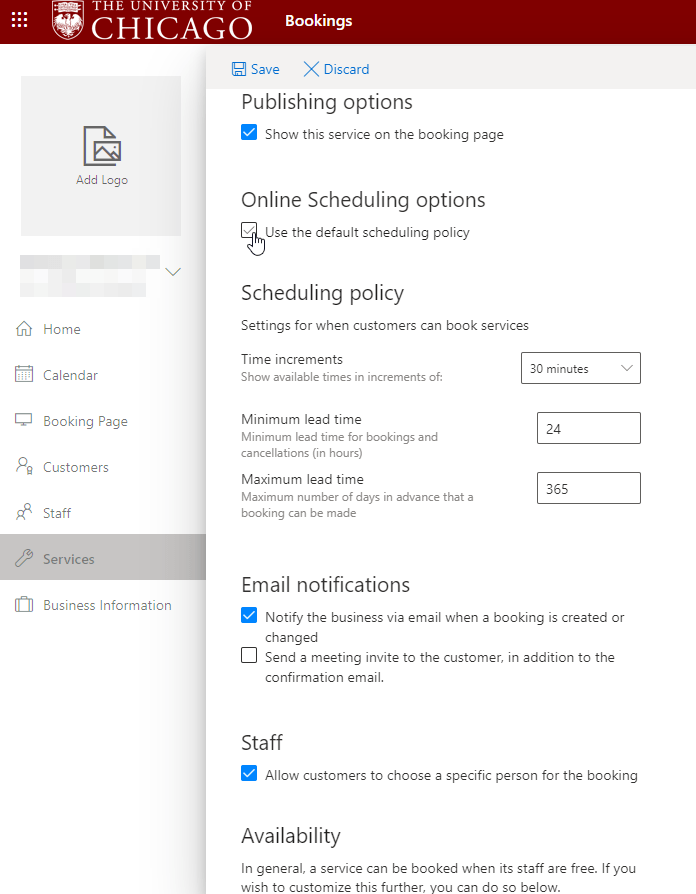
- Enable Show this service on the booking page. You only want to disable this if you are defining a service that is only offered only periodically, such as an exam review session. This setting makes it convenient to use the same service multiple times; all you need to do is adjust the available times and re-enable this display setting for each exam review, for example.
- You can use the default scheduling policy defined on the Bookings Page settings or choose a policy that applies only to this service. Defining a scheduling policy allows you to refine the parameters that restrict how services are booked.
- Time increments: the duration for each increment of time during the available time for a service; in other words, if you are available for office hours from noon-3:00 p.m., setting the time increment for 30 minutes will give you a set of 30-minute appointments.
- Minimum lead time: this will define the latest that someone can set or cancel an appointment for the service. If you offer lab tutorial time, but need to make sure there is opportunity for staff to set up a bench for the appointment, you might set this to sixty minutes so no one can schedule something only a couple of minutes before they show up.
- Maximum lead time: if you only want to accept appointments for this service a certain period of time in advance, set this field as necessary.
Notes:- If you define a new scheduling policy, you will also be able to choose options for sending email notifications or booking specific staff for just this service.
- You will also be able to set different availability for a service during a certain date range, which is useful for blocking out times lab space is unavailable, for example.
- Assign staff to the service by clicking their name on the right. Selected staff will be highlighted in gray and have a checkmark next to their name.
- Click an assigned staff member to remove them from the service.
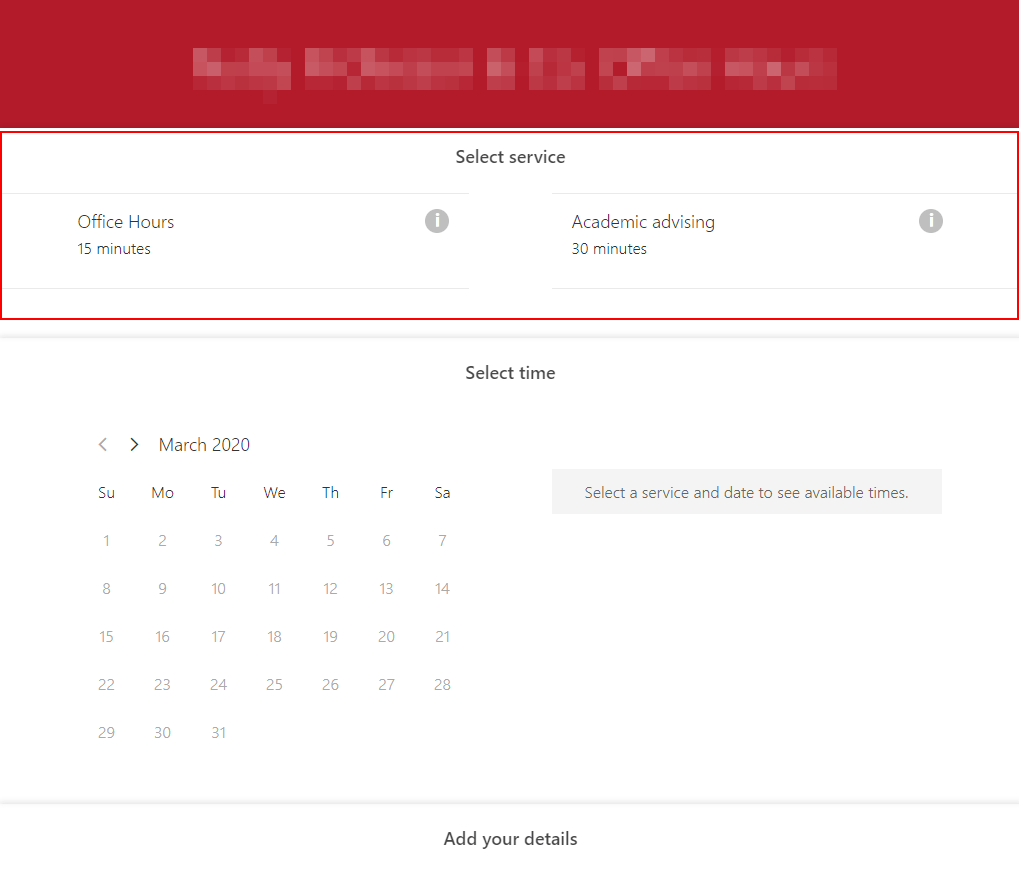
- Click Save. Your defined services will all appear on the Services screen. Your bookings page will also display them for people to select when setting appointments, as shown in the screenshot below:
Publish Your Bookings Page and Share the URL
Now that you have your group, staff, and service details defined, you are ready to prepare your Bookings page for publication.
- Click Booking Page in the left navigation pane.

- Complete setup for your page as follows:
- Booking page access control: choose whether to allow only visitors with a UChicago email to book appointments, and whether to hide your page so that it won’t appear on search engines like Google.
- You do not need to use the Customer data usage consent fields because the University does not gather user data in Bookings.
- Set up a default scheduling policy for all the services you offer. Remember that if you want to apply specific policies to some services, you can do so on the service details screen.
- Decide how you want to handle email notifications. Remember that you can set up different confirmation and invitation email messages for each service on the Service page, if you desire.
- Define general availability. If there are times you don’t want staff to be bookable for anything, you can define that here.
- If you desire, customize your page with a color theme or logo.
- Make sure the selected time zone is correct for you and your staff. Setting the correct time zone is critical for virtual meetings, so do not skip this field.
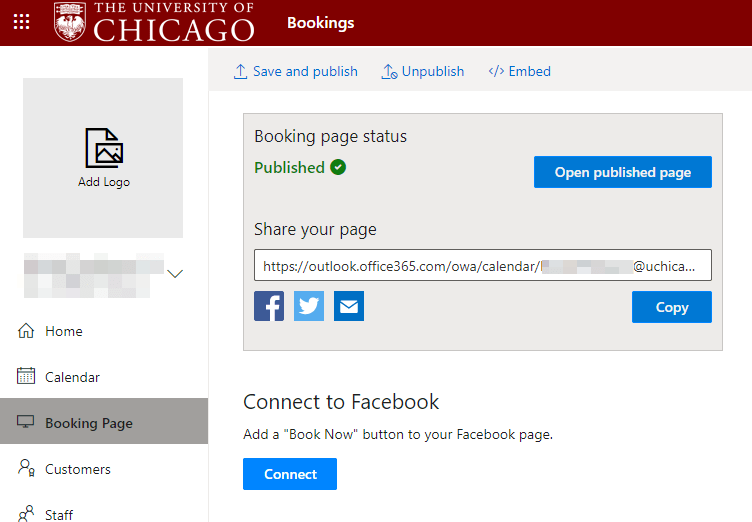
- When you are finished, click Save and publish in the upper left.
- The status box will update to Published, and you now have a URL to share with your students and colleagues. Add this URL anywhere you know people will look for your contact information.
Further Information and Support
- For more information on how to set up your Bookings Calendar, please see the UChicago Collaboration Site Bookings page.
- A good step by step guide is available in the article Publish Your Business Calendar Online With Microsoft Bookings.
- If you need direct assistance, contact the IT Services Service Desk, or your local IT support.